Are you considering upgrading your system disk from a traditional hard disk drive (HDD) to a solid-state drive (SSD)? This process can significantly enhance your computer’s performance as SSDs offer faster boot time, longer lifespan, and better application loading speed. However, to make the most of the SSD, you need to set it as the boot drive.
This article will walk you through a step-by-step tutorial on setting the SSD as the boot drive in the BIOS.
Phase 1. Choose and prepare your SSD
Preparing your SSD is the first step in swapping from an HDD to an SSD. Here’s how to get everything ready and ensure a seamless transition:
1️⃣ First, choose a suitable SSD that matches your system’s specifications in terms of capacity, speed, and form factor. Many older and budget laptops support 2.5-inch SATA SSDs, while modern laptops often use M.2 NVMe SSDs for better performance. Desktops can utilize both 2.5-inch SATA SSDs and M.2 PCIe (NVMe) SSDs, with the latter offering significantly faster speeds. Always check your device’s compatibility before making a purchase.
2️⃣ Second, you need to install the new SSD on your computer and initialize it before cloning.
Tools you will need:
- Screwdriver (to open your computer case if needed).
- SATA data & power cables (only for 2.5-inch SATA SSDs; M.2 SSDs do not require cables).
Follow this tutorial to install, enable, and initialize your SSD:
Step 1. Install the SSD
- Turn off your computer and unplug all power cables.
- Use a screwdriver to remove your computer’s back panel.
- Identify the appropriate slot: For a 2.5-inch SATA SSD, replace the existing hard drive or use an additional bay (if available). For M.2 NVMe SSD, remove the old one, insert the new one into the M.2 slot at a slight angle and secure it with a screw.
Step 2. Enable SSD in BIOS
- Restart your computer and immediately press the key to enter BIOS (commonly F2, Del, Esc, or F10).
- Navigate to Advanced, Boot, or Storage Configuration.
- If this new SSD is not detected, turn on or enable it and save the changes.
Step 3. Initialize the SSD in Disk Management:
- Right-click the Start icon and select Disk Management.
- When prompted, you can select GPT or MBR as the partition style (choose the same partition style as your old disk).
You can continue to create new volumes in this utility if you wish.
3️⃣ Lastly, if you are using a used SSD as the destination disk, migrating the system to another disk will overwrite all the data on it. It’s vital to back up important data on it before you begin.
Phase 2. Migrate Windows to the SSD
EaseUS Partition Master Professional is a powerful tool that simplifies disk-management tasks. It allows you to migrate your Windows operating system from the HDD to the SSD without needing to reinstall the software. Moreover, this tool supports changing the boot drive in a user-friendly way.
Follow this step-by-step guide to migrate Windows from HDD to SSD:
Step 1. Download and run EaseUS Partition Master on your computer, and select “Disk Clone” from the left menu.
Step 2. Choose the “Migrate OS” option and click “Next”.
Step 3. Select the SSD or HDD as the destination disk and click “Next”.
Step 4. Click “Yes” when this warning appears: ‘The data and partitions on the target disk will be deleted.’ Make sure that you’ve backed up important data in advance. If not, do it now.
Step 5. Preview the layout of your target disk. Then click “Start” to migrate your OS to the new disk.
Step 6. Lastly, click “Done” and choose when to reboot the computer.
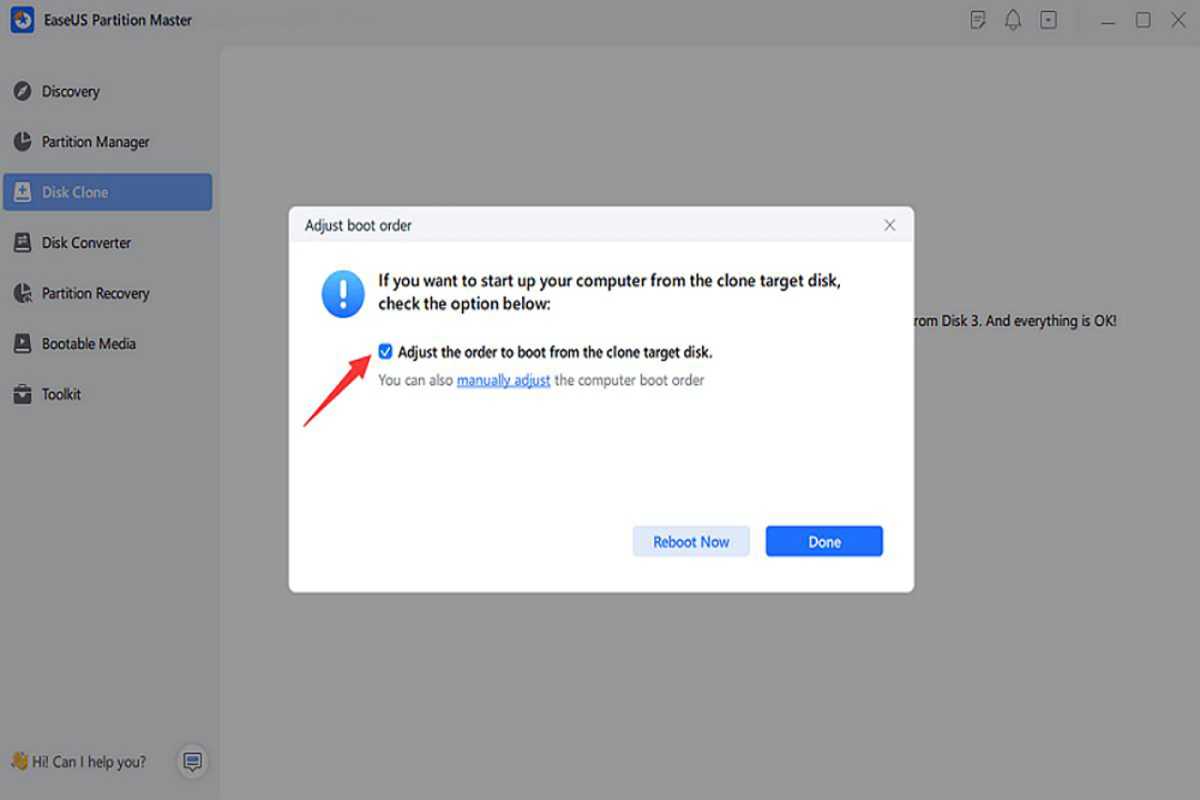
EaseUS
- “Reboot Now” will trigger a boot from this new disk instantly.
- “Done” will require you to manually restart the computer later.
After the OS migration, you still need to set the new SSD as the boot drive in the BIOS. Here’s how to do that:
Phase 3. Set the new SSD as the boot drive
The last step is to restart the PC and change the boot order from the old HDD to your new SSD drive. You have two options:
Option 1. Change boot drive automatically
For tech novices, EaseUS Partition Master allows you to set a new disk as the primary drive without entering UEFI/BIOS, streamlining the process of managing boot settings.
Step 1. In EaseUS Partition Master, navigate to “Boot Repair” > “Toolkit”.
Step 2. Click the “UEFI items” tab and change the boot order by dragging the SSD to the first position.
Step 3. Click “Save” to apply the changes.
By doing this, your OS is set to boot from the new hard drive.
Option 2. Set SSD as boot drive in BIOS manually
Another way is to adjust the boot settings directly in UEFI/BIOS on your computer:
Step 1. Restart your PC and press the necessary key to enter the BIOS (this varies with different computer manufacturers).
| Brand | BIOS Key(s) | Boot Menu Key |
| Acer | F2 or Del | F12 |
| ASUS | F2 or Del | Esc or F8 |
| Dell | F2 | F2 |
| HP | F10 or Esc | F9 |
| Lenovo | F2 (or Fn + F2) | F12 (or Novo Button) |
Step 2. Switch to the boot option, change the boot order, and set your computer to boot from the new SSD.
Step 3. Press the F10 key to bring up the “Save and Exit” tab. Click “Y” or “Yes” to confirm.
Conclusion
This guide provides clear instructions on migrating the Windows OS to an SSD and setting that as the primary boot drive, empowering you to harness the full speed and reliability of the SSD. Switching your boot drive to an SSD will enhance your computer’s efficiency, delivering lightning-fast startup speeds and a smoother overall experience. With tools like EaseUS Partition Master, the upgrade becomes effortless – eliminating the hassle of reinstalling Windows by seamlessly cloning your operating system.
